Easy Joe’s Stone Crab Key Lime Pie Recipe In 5 Steps

You know, I’ve always been on the hunt for the perfect Key Lime Pie recipe. When I first tried it at Joe’s Stone Crab in Miami, I knew I’d found it. This pie has that perfect blend of sweet and tangy, with a light but rich texture. Naturally, I had to recreate Joe’s Stone Crab Key Lime Pie Recipe at home.
Jump to RecipeThe Story Behind Joe’s Stone Crab and Their Legendary Key Lime Pie
When I discovered that this century-old restaurant wasn’t just famous for its stone crabs but also for this magical pie, I had to dig deeper into its secrets. Joe’s Stone Crab has been around since 1913, and their Key Lime Pie has become legendary over the years. The reason? They’ve stuck to tradition, using only the freshest and highest-quality ingredients.
This article contains affiliate links, but these recommendations are based on objective product review and experience.

What You’ll Need: Ingredients and Tools for the Perfect Key Lime Pie
When I finally decided to give this recipe a go at home, I quickly realized that the secret to success lies in using the right ingredients. For the crust, you’ll need about 1 1/2 cups of crushed graham crackers. I mixed them with 1/3 cup of melted butter—this creates that crispy, flavorful base.
For the filling, I used 4 egg yolks and 1 can of sweetened condensed milk (about 14 ounces). Then, I mixed in 1/2 cup of freshly squeezed Key lime juice. It’s crucial to use juice from these small, fragrant Key limes—they give the pie that special taste.
As for tools, you’ll need a 9-inch pie dish, a mixer, and a bit of patience while waiting for the pie to chill.
Read also: Easy 1-Hour Rich, Creamy Parmesan Chicken Pot Pie Recipe
Step-by-Step: How to Make Key Lime Pie Like They Do at Joe’s Stone Crab
When I first attempted to make this pie, I thought it would be complicated. But as long as you follow the steps, it’s actually pretty straightforward:
- Have you ever made cheesecake? If so, you understand how to crush the cookies. The crumbs should be very fine. Then I mix it with melted butter and tamp it well in the pan. To do this, first I press everything thoroughly with my fingers, and then take a glass and press everything with the bottom of the glass. After all, the base must be stable and even.
- Now I need to wait 10 minutes until the pan with cookies stands in the refrigerator and the butter completely envelops the crumbs and hardens well.
- I don’t mess around at this time, I beat the yolks and condensed milk in a bowl. I want the mixture to be soft and viscous. I also have to keep an eye on my kids, because this mixture is so delicious that I recently made this pie, and they thought it was a ready-made dessert and ate a good half. So if you have such little rascals, make sure you have enough filling for the pie. Then I take a lime and squeeze out the juice well. All you have to do is compare the color of the filling before and after adding the citrus juice. Now it will be gently caramelized.
- Now I carefully pour the filling onto the base and bake for 15 minutes at 350°F. It is important not to overbake it – it should still tremble a little in the center when you take it out.
- Now, despite the enchanting smells, you need to wait. First, the pie cools on the table, and then – in the refrigerator. Of course, it is better to leave it there overnight, but if you do not have the strength to wait, then at least for 2 hours.

What important thing did I understand while cooking this dessert?
Over time, I started to play around with the recipe. One of my favorite variations is adding a bit of shredded coconut to the crust—it gives the pie a new, interesting flavor. And if you’ve got gluten-free guests, you can swap out the graham crackers for gluten-free cookies—the result is just as delicious.
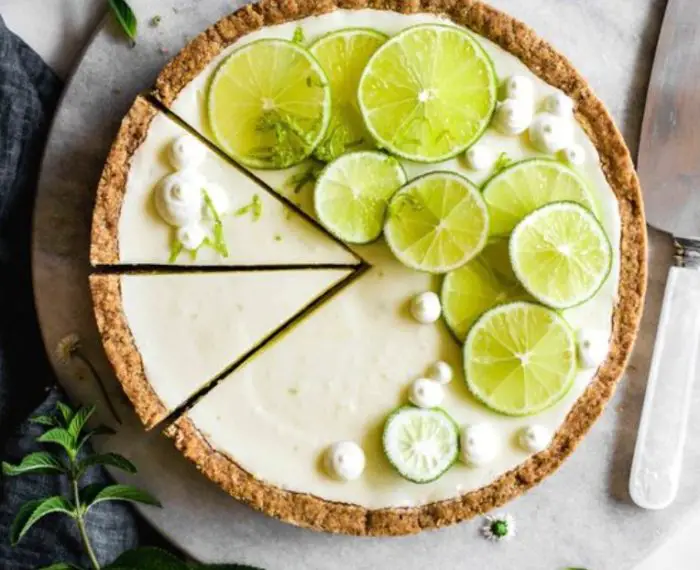
I like to serve my Key Lime Pie slightly chilled, with a dollop of whipped cream and some grated lime zest on top. It’s not only pretty but adds a nice fragrance too. Sometimes, I’ll dress it up with fresh berries—raspberries or blueberries make a great contrast to the tart lime.
From my own trial and error, I’ve learned one key thing—don’t overbake the pie. As soon as the center stops jiggling, it’s ready to come out. Another tip is to be patient with the chilling time—it really makes a difference in the texture.

FAQ
What type of limes should I use for Key Lime Pie?
I always use Key limes because they give the pie that signature flavor and aroma. If you can’t find them, regular limes will work, but the taste will be slightly different. When I once used regular limes, the pie turned out less intense and aromatic.
Can I substitute sweetened condensed milk with something else?
Sweetened condensed milk is a key ingredient in classic Key Lime Pie. I once tried replacing it with coconut milk, but it changed the taste and texture a lot. If you want to experiment with healthier alternatives, you can try, but it will be a different dessert.
How do I know when the pie is done?
Great question! When I first started, I worried about underbaking the pie. But then I learned the trick is to take it out of the oven when the center still jiggles slightly. It will set as it cools. Don’t overbake it, or the filling will become too firm.
How long can I store Key Lime Pie?
I usually store the pie in the fridge for up to three days, though honestly, it rarely lasts that long in our house! It’s important to cover it with plastic wrap to keep it from absorbing other odors.
Can I prepare the crust in advance?
Absolutely! Sometimes I make the crust the day before to save time. I just prepare it and leave it in the fridge. The next day, I just add the filling and bake.
How should I whip the cream for topping?
I prefer to whip the cream by hand because it’s easier to control the consistency. I start with cold cream and whip it slowly, gradually increasing the speed. I stop as soon as it holds its shape. If you whip it too long, the cream can become too thick.
Can I freeze Key Lime Pie?
Yes, you can! I’ve frozen the pie several times, and it keeps its taste and texture. The key is to wrap it well so it doesn’t pick up other flavors from the freezer. It’s best to thaw it in the fridge rather than at room temperature so it doesn’t lose its shape.
Joe’s Stone Crab Key Lime Pie Recipe
Equipment
- Mixing bowls
- Glass or tamper (for pressing the crust)
- Oven
- Refrigerator
Ingredients
Crust
- 1 ½ cups graham crackers crushed
- ⅓ cup butter melted
Filling
- 4 large egg yolks
- 1 can sweetened condensed milk 14 ounces
- ½ cup freshly squeezed Key lime juice about 4-5 Key limes
Instructions
- The crumbs should be very fine. Then I mix it with melted butter and tamp it well in the pan. To do this, first I press everything thoroughly with my fingers, and then take a glass and press everything with the bottom of the glass. After all, the base must be stable and even.
- Now I need to wait 10 minutes until the pan with cookies stands in the refrigerator and the butter completely envelops the crumbs and hardens well. I don’t mess around at this time, I beat the yolks and condensed milk in a bowl. I want the mixture to be soft and viscous. Then I take a lime and squeeze out the juice well. All you have to do is compare the color of the filling before and after adding the citrus juice. Now it will be gently caramelized.
- Now I carefully pour the filling onto the base and bake for 15 minutes at 350°F. It is important not to overbake it – it should still tremble a little in the center when you take it out. Despite the enchanting smells, you need to wait. First, the pie cools on the table, and then – in the refrigerator. Of course, it is better to leave it there overnight, but if you do not have the strength to wait, then at least for 2 hours.
Nutrition
Conclusion
Joe’s Stone Crab’s Key Lime Pie isn’t just a dessert; it’s a slice of history and a taste of summer on your plate. Try making it yourself, add your own twist, and enjoy every bite!
I love hearing how your pies turn out! Share your results and ask any questions in the comments—I’m always here to help and offer more tips.
If you liked this recipe, subscribe to my blog to get more delicious recipes and tips straight to your inbox! And don’t forget to check out other recipes—I’ve got plenty of goodies waiting for you.

My name is Ania, and I am very glad to see you here. I have always loved cooking; even some of my earliest memories are flipping through a cookbook and making pudding standing on a stool because I was too small to reach the stove.
You should know that I am not a professionally trained chef, just a big food lover who grew up in a family obsessed with cooking and focused on what we eat.

This Key Lime Pie recipe is spot on! It’s tangy, creamy, and has that perfect balance of sweet and tart. Just like Joe’s Stone Crab! I’ll definitely be making this again
I am impressed with this site, very I am a big fan .
I couldn’t believe how simple this recipe was! The pie came out smooth and full of flavor—just like the real thing from Joe’s Stone Crab. A must-try for Key Lime Pie lovers
This is by far the best Key Lime Pie recipe I’ve tried! Only 5 steps, and the result was a creamy, delicious dessert. I’ll be making it again for sure.
I made this Key Lime Pie, and it was the perfect balance of sweet and tangy! The recipe was super easy to follow, and it turned out just like the one from Joe’s Stone Crab!